Sponsorship's, Nozzles and Extruded Aluminum! Oh My!
Oh My!
This is a little in reverse order but its worth it! Tonight I received my confirmation letter for Maker Faire! WoooooooooooooooooooooOOOooOoOoooo!!! Thank you very much to the folks at Make for allowing me to be a part of the Maker Faire!!!
Sponsorship!
I would like to give a big, BIG thank you to Ultimaker who has graciously offered to help sponsor the El Monstro build! They offer will definitely help to move things forward in a very positive way. I have been using an Ultimaker 3D printer for about seven months now and I love it. Without it this whole project would not be possible. If you have some time please stop by their website and check out their amazing machine!
In my last post I talked about making another board for the thermocouple to communicate with the RUMBA board. With the help of Ultimaker I am looking at switching electronics to the Ultimaker Board. I would swap out the Stepper Drivers for the Pololu black stepper drivers that I had intended to use with the RUMBA board. The reason being that the Pololu black stepper drivers can handle a higher amperage which means that I can drive more power to my stepper motors (all 6 of them that I am looking at using). This also means that I can use the Ultimaker thermocouple board to help simplify everything.
Nozzles!
The next bit of news is just as exciting as the last! Mostly because I am learning to use the mini metal lathe. This is a tool that I have wanted to learn to use for a long time and now I finally have a reason to. Its a rather addicting machine to learn to use. Just like a laser cutter, CNC machine or 3D printer, you sometimes find yourself saying, "I could machine that..."
With this I decided to design my own nozzle that is a PrusaNozzle variant. First thing I did was look over the designs of the PrusaNozzle from Joseph Prusa's website. You can find the PDF version of the plans through this link.
From here I wanted to work on the lathe a bit before I created a design so that I understood how it worked better and also so that I could get an idea of what tools I had readily available at the hacker space. My first attempt wasn't the greatest thing ever but keep in mind that it was the second time I have ever used a metal lathe. It didn't turn out all that well because the hacker space did not have the right tools for creating the cooling fins along the shaft.
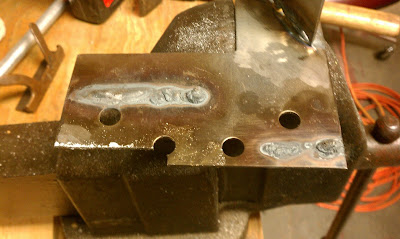
So after talking to another member he offered to let me use some of his scrap tool steel (tools steel is a hardened steel that holds an edge very well and is well suited for making tools from) plate that he had been practicing his TIG welding on.
It was an ugly piece of scrap but it was free tool steel none the less! So from here I needed to make a tool that would both fit in the lath and create the correct sized space between the fins. The bottom left corner that is missing is where I sawed a piece of plate off. I then tool the piece to the bench grinder to shape it and then filed it down further to hone the tip and thickness. This is what I ended up with.
I had to cut the notch into the piece in the center to lower the position that the tool sat in the tool holder so that the tip of the bit would hit the material correctly. After a few test cuts and adjustments I was able to get it to cut to the correct depth and thickness (1.5mm).
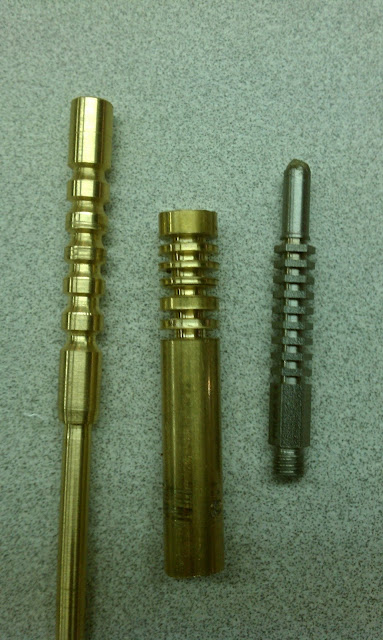
Here is an example of my progress.
Left - First Attempt; Center - Second Attempt/Test; Right - PrusaNozzle
So now that I had a bit that works well and more experience with the the metal lathe I came up with a design. It is a longer version of the PrusaNozzle with a larger diameter hole at the tip.
It was only after I began making the nozzle did I realize that I designed the nozzle a bit to long. It was a simple fix to just skip several of the fins and go right to the back portion. The back portion of the nozzle was left at a larger diameter to allow me some room to create threads. In addition I left it larger because at the time I wasn't sure how I was going to mount the nozzle to the printer. I have since figured out how to mount it and I will have that in a later update.
So now that I have a plan I cut off a hunk of 3/8" round 360 brass and went to work! I machined down the bulk of the nozzle to the outer diameter of the fins. Then I marked out the start and end of the fins (the small notch at the front and back), took more material off the tip to get it down to the correct size and finally I added the angle to the front of the nozzle to give it a more pointed shape. I also used a tiny drill bit (0.8 mm) and bored out the tip a little extra deep to make it easier to find when I did the larger bore from the back.
Next I added in the fins. You can see here how it all turned out. I still had to finish the back portion of things though.
So I flipped it around and cut the back portion down to the right diameter then I bored out the back end to 3mm to accept filament. I also threaded the tip so that a heated block could be easily screwed onto it. And here is the result next to a PrusaNozzle!
So the final step was to attach the heater block and see how it all looks.
Success! I will be testing it out this coming week to see how it work and if it extrudes filament at the correct diameter (0.8mm).
I am doing everything in 360 brass for the time being until I have more experience and I have made a few more things on the lathe. The goal is to create a version of my PrusaNozzle variant in stainless steel. I picked up a piece of 303 Stainless Steel today from a local metal supplier and I also got a chunk of 1" x 1" 2024 Aluminum.
The idea with the aluminum is that I can create a larger heater block with it. The reason for this because of the higher volume of material that I will be moving through the nozzle.
While at the metal suppliers today I also picked up a few things that may turn out to be an interesting find. They are stainless steel pneumatic quick connects that were buried in a bin in the catacombs of the metal suppliers basement (its a 3 acre in door and outdoor place with a crazy amount of stuff). I need to hit up the hardware store and try to find something that will let me connect the nozzle and the quick connect together.
So the next step is to make another version of my PrusaNozzle variant in brass with a 1mm diameter hole then take a crack at making on in stainless. I will have more updates on my attempt at stainless later in the week.
Extruded Aluminum!
And as the last part of this post, I have received an update from OpenBuilds about the parts that I ordered a while ago for the frame. They will be shipping out soon! So hopefully I will have them soon so that I can get more things going!
I will have more updates in a few days! Stay tuned!


